My Shutterfly Book - Take 2
Well, yes, I am still alive and I am the worst blogger ever...as well as the worst Shutterflybook maker in the whole wide world.. I tend to get complicated...what my problem was? I simply couldn't decide HOW I liked my Book to look like - apart from great of course LOL.
Now before Christmas everyone comes out and shows those gorgeous books all perfectly done with a certain style and I was wondering if I'd like to do this, too....of course I wanted to use my products for all the family (and me) to see how all looks like printed, so I first decided to use QPs...Great idea!! But using them over and over again for 20 pages? Ugh....to make it short: I ended up choosing among my layouts and leave this "theme" thingy out. The only thing I wanted to do was to try to get some pages that were done with the same kit together...and YES - I do have some layouts to get into my book LOL
What I'd like to tell you: Please think about HOW you want your book to look like BEFORE you upload to your Shutterfly space.
But coming back to this point: most of you will already have some finished pages they'd like to see in their book. I must admit, as being a German metric girl, I have been struggling with inches a bit, despite the templates offered for download on Shutterfly and helpful friends (TY Trish :) ). I wasn't really sure if I understood all right. I finally decided to go for Wendy's Shutterfly Templates. She also has those fab actions for PS and PSE to trim your pages to meet Shutterfly needs but unfortunately I can't use them with my german version. So I went with the templates which are of great help, too. So I hope that I got all right using them :) and will also manage the tricky cover and spine of my book thanks to them.
Now I spent some time cross checking my layouts against Wendy's templates, moving journaling or important elements from the trim area to the live area. I highly recommend keeping your original layout files !! Wendy might have remedy for those that saved their flattened files only, but it is definitely easier to make changes when you have your originals handy. Now when you moved and corrected all your layouts and are ready to save, there will be the question HOW? Well, you will have to save as jpeg of course and for best print quality, which would be 300 dpi. So no "Save for Web" option here !!
Uploading to Shutterfly
First you will have to log in to your account of corse LOL
I do call several browsers my own but decided to go for IE..why? Not that i love it that much but I expected less problems as most of the websites are optimized for IE....
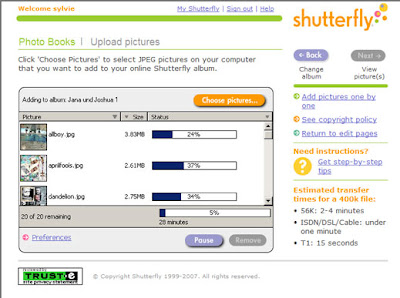
Then I started uploading my pics which is the easiest thing to do with Shutterfly...just choose the desired folder on your HD and upload. What I loved best is that this neat little plugin shows you the estimated upload time for all your files as well as for each file you chose. This is better than sitting in front of the same page for hours with this weird "please wait" phrase in front of you LOL

I was astonished how fast all went, I had expected that it would be taking more time to upload than it actually did.
I am not sure though how it is for those on dial up, though. The more pages your book contains and the more pics you might need to upload the longer it will definitely take. But I am sure that there are some options like sending in your pics on CD or upload the pics one by one that might be helpful.
Finally: Creating the Album
Oh this has been so much fun!! It is all about drag and drop !!
Well, after having uploaded all your pics you start your book by clicking on the desired book format, mine was the 8x8 Story Book. I was confused when hitting "Get started" and saw those pastel backgrounds and templates to insert your pages to..."weird" I thought..."I want to make my own" And then I realized that I had missed a little drop down box

Click on : "Print your Digital Scrapbook" and you will get transferred to a "naked" 8x8 book template..then click "Get started" and "Next" . Now it is important to click on "Get pictures" to load your pages.

Then click "Add"

And now start dragging and dropping your pages to the virtual book, rearrange, just play around...then cover, back and spine and you are done. And I am sure you will be done in no time at all :)
Now you are ready for ordering...and this is done in no time at all, too, all gets explained very well and there will be no surprises in the end.
I am living in Germany and was gifted with this wonderful opportunity of creating this 8x8 Story Book to try it out. Shutterfly ships to a lot of countries outside the US and now I am waiting for my book to arrive.
I will let you know more about it when I have it in my hands. You can easily track your orders and so I was able to see today that it already has been shipped, which is darn fast...so I might be able to recieve it even before Christmas! Imagine! Shipped from the US to Germany! I am sooo excited!
However: Thank you Shutterfly !!
Now you kind readers, i hope I was of any help, I will now go and try out the SF greeting cards and let you know how it went. I hope my little SF Book story was helpful for you! And excuse my bad English and all my typos. LOL
Take care, wherever you are
Sylvie
Now before Christmas everyone comes out and shows those gorgeous books all perfectly done with a certain style and I was wondering if I'd like to do this, too....of course I wanted to use my products for all the family (and me) to see how all looks like printed, so I first decided to use QPs...Great idea!! But using them over and over again for 20 pages? Ugh....to make it short: I ended up choosing among my layouts and leave this "theme" thingy out. The only thing I wanted to do was to try to get some pages that were done with the same kit together...and YES - I do have some layouts to get into my book LOL
What I'd like to tell you: Please think about HOW you want your book to look like BEFORE you upload to your Shutterfly space.
But coming back to this point: most of you will already have some finished pages they'd like to see in their book. I must admit, as being a German metric girl, I have been struggling with inches a bit, despite the templates offered for download on Shutterfly and helpful friends (TY Trish :) ). I wasn't really sure if I understood all right. I finally decided to go for Wendy's Shutterfly Templates. She also has those fab actions for PS and PSE to trim your pages to meet Shutterfly needs but unfortunately I can't use them with my german version. So I went with the templates which are of great help, too. So I hope that I got all right using them :) and will also manage the tricky cover and spine of my book thanks to them.
Now I spent some time cross checking my layouts against Wendy's templates, moving journaling or important elements from the trim area to the live area. I highly recommend keeping your original layout files !! Wendy might have remedy for those that saved their flattened files only, but it is definitely easier to make changes when you have your originals handy. Now when you moved and corrected all your layouts and are ready to save, there will be the question HOW? Well, you will have to save as jpeg of course and for best print quality, which would be 300 dpi. So no "Save for Web" option here !!
Uploading to Shutterfly
First you will have to log in to your account of corse LOL
I do call several browsers my own but decided to go for IE..why? Not that i love it that much but I expected less problems as most of the websites are optimized for IE....
Then I started uploading my pics which is the easiest thing to do with Shutterfly...just choose the desired folder on your HD and upload. What I loved best is that this neat little plugin shows you the estimated upload time for all your files as well as for each file you chose. This is better than sitting in front of the same page for hours with this weird "please wait" phrase in front of you LOL

I was astonished how fast all went, I had expected that it would be taking more time to upload than it actually did.
I am not sure though how it is for those on dial up, though. The more pages your book contains and the more pics you might need to upload the longer it will definitely take. But I am sure that there are some options like sending in your pics on CD or upload the pics one by one that might be helpful.
Finally: Creating the Album
Oh this has been so much fun!! It is all about drag and drop !!
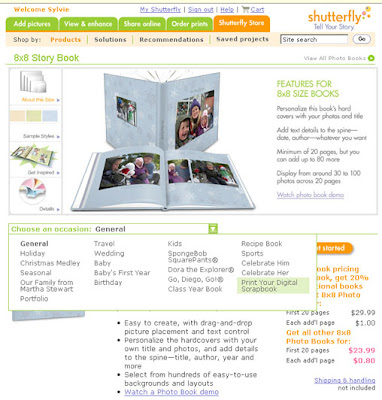
Well, after having uploaded all your pics you start your book by clicking on the desired book format, mine was the 8x8 Story Book. I was confused when hitting "Get started" and saw those pastel backgrounds and templates to insert your pages to..."weird" I thought..."I want to make my own" And then I realized that I had missed a little drop down box

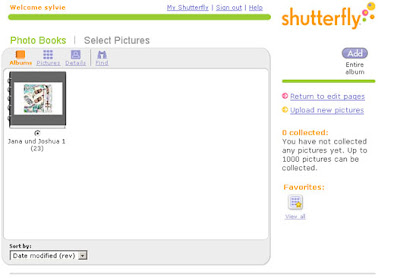
Click on : "Print your Digital Scrapbook" and you will get transferred to a "naked" 8x8 book template..then click "Get started" and "Next" . Now it is important to click on "Get pictures" to load your pages.

Then click "Add"

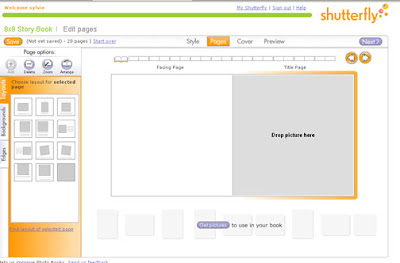
And now start dragging and dropping your pages to the virtual book, rearrange, just play around...then cover, back and spine and you are done. And I am sure you will be done in no time at all :)
Now you are ready for ordering...and this is done in no time at all, too, all gets explained very well and there will be no surprises in the end.
I am living in Germany and was gifted with this wonderful opportunity of creating this 8x8 Story Book to try it out. Shutterfly ships to a lot of countries outside the US and now I am waiting for my book to arrive.
I will let you know more about it when I have it in my hands. You can easily track your orders and so I was able to see today that it already has been shipped, which is darn fast...so I might be able to recieve it even before Christmas! Imagine! Shipped from the US to Germany! I am sooo excited!
However: Thank you Shutterfly !!
Now you kind readers, i hope I was of any help, I will now go and try out the SF greeting cards and let you know how it went. I hope my little SF Book story was helpful for you! And excuse my bad English and all my typos. LOL
Take care, wherever you are
Sylvie
Labels: shutterfly, take 2


